
|
a Designer Chair with Leather Futon (by Philip Staiger, Jan. 2000) |
 |
[ go to bottom
] [ ZAP and others file sizes ]
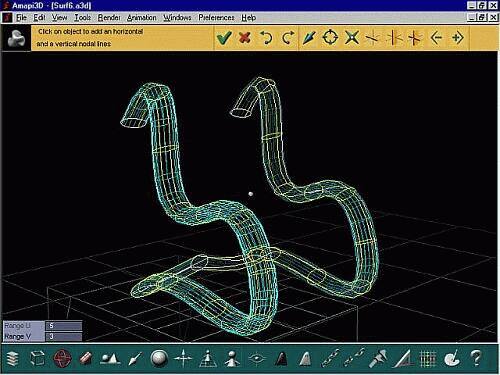
| Building a Frame
Using the 2D draw palette (pencil in construction toolkit), I select the 'Interpolated Curve' and make sure that I'm in Nurbs mode prior to that. At the end of the curve creation, a low resolution line is shown, but you can use +/- keys while making the curve to change that, or the Smooth tool later as well. I did only half of the frame, then used the 2D mirror tool in
the draw
palette to create the second half. I used the SPACEBAR to toggle
between
available axes to select the proper one and clicked on the end point of
my half-curve.
|
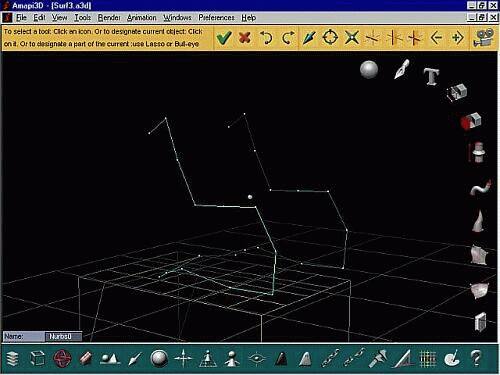 |
| Amapi offers a variety of 2D editing tools, here I used the
Stretch
tool to adjust the position and fine tune the tangents and curvature at
some of the key points on the interpolated curve. Notice that you can
either
work at the level of the original coarse curve or the resulting
interpolated
curve's segments, thanks to Amapi's dynamica geometry history, even
when
doing a smooth on a non-Nurbs curve and working just with a smoothed
regular
polyline (or polygons, for that matter).
With just a few click-and-drags you can set the shape for your designer chair's frame, tits profile etc...
|
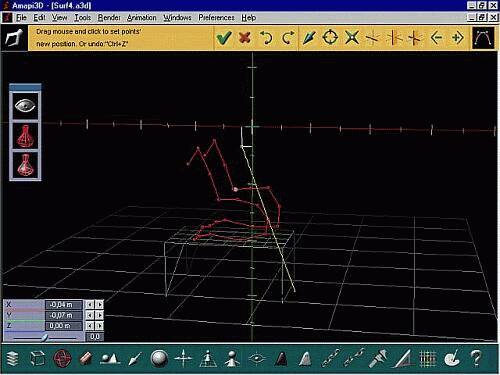 |
| It's time to create a section for the frame. I start with a
circle
and position it at one of the ends of the curve which will serve as
sweep
path. We could have used the thickness tool instead to make the tubular
effect, but with this approach we have better control of resulting
primitive
types (if and when that matters). I make sure the circle is still a
Nurbs
as well, use the Rotate tool to give it approximately the orientation
it
will need to be roughly perpendicular to the path (although Amapi will
do that for us later).
I also change the scale of the circle in just one or the other
axis'
direction, to make it an ellipses or oval. Use the Stretch tool if you
further want to reshape it.
|
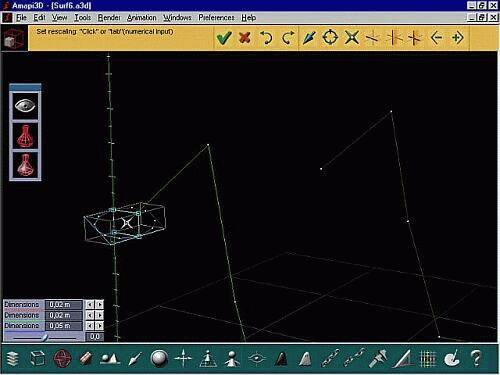 |
| Using the Sweep tool
When we're ready, the Sweep tool will be used. Select the circle, click the Sweep tool, then click the profile curve which serves as a sweep path. After clicking the sweep path, Amapi shows the swept curface, two openings (in red). |
|
| I can use the +/- keys to change the radius of the sweep from start to end, and also the SPACEBAR to toggle between various orientations of the section against the sweep path. Select the one in which the section appears to remain perpendicular against the path, or at least close to that. But you'll easily see which one is appropriate to avoid flats or self-intersections in this complex sweep. | 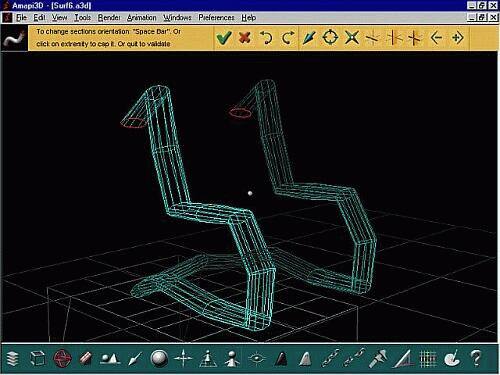 |
| Hitting the ENTER key will reveal a quick phong rendered view. You can tell that it is still very coarse, but also that Amapi's renderer attempts to smooth the facets. This feature can be disabled in the shader if you want to see it in a very faceted, flat shaded manner, as seen below. | 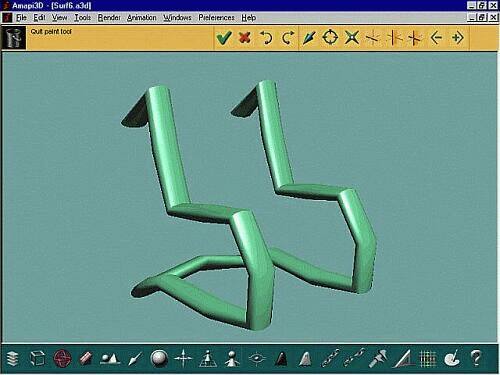 |
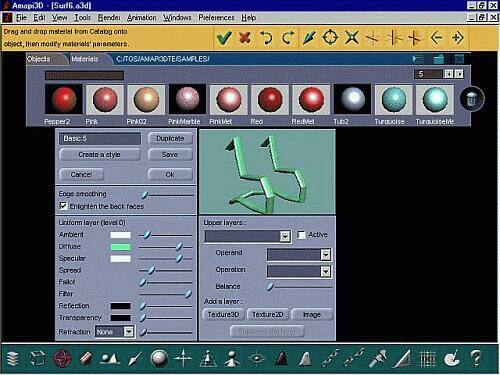
| Set the 'Edge Smoothing' slider to zero. (In order to see
that slider,
you must set the Render settings to 'extended editor' mode. Select the
Render menu and 'Render Settings' for that.
Note that you can also check or disable back lighting. This helps in bdetermining if faces are clockwise or counterclockwise facing, which may be an issue with other programs when exporting from Amapi. If you need to invert the facet orientation, use the 'Orient
Facets'
tool from the advanced tool menu, or from a shortcut assigned via the
shortcut
editor.
|
 |
| Here's the flat shaded equivalent (no edge smoothing at rendering). | 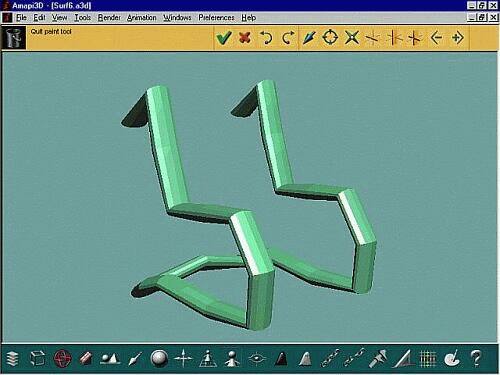 |
| We'll go back to doing edge smoothing at rendering time (in
the shader)
for the rest of this tutorial. Set the slider to about 30.
(degrees) Another thing we can check is whether this is indeed still a Nurbs surface. The frame of our designer char was modeled from curves, at least one of which was a Nurbs curve. (both in this case). The sweep tool will thus produce a Nurbs curve. When you use the Smooth tool, if it is a NURBS curve, then you can change just the tesselation counter (subdivision) along the two orthogonal directions of the Nurbs space, U and V. Use the +/- keys to increase in one direction. Hit the SPACEBAR for the other dimension, and use +/- again. Or enter numeric mode and enter the desired number for U,V directly with the keyboard.
|
 |
| Here's the resulting rendering after a few more smoothing increases. |  |
| Starting the Futon Cover | |
| We're now ready to add the futon cover, i.,e. a cozy looking
piece
of pillow and fabrib loosely placed over the frame. We'll want to make
it look at lieelt bit like soft leather perhaps, or rough leather with
bumps, or maybe a breathing soft fabric such as wool or cotton.
Whatever...
I used a side view and selected Orthographic view here. Then I select the 2D draw pallete and start drawing, in Nurbs mode or not, an interpolated curve (or even a simple polyline). In this case, the curve goes from the top (head rest) along the back rest to the seat flat and then to the front and further down .
|
 |
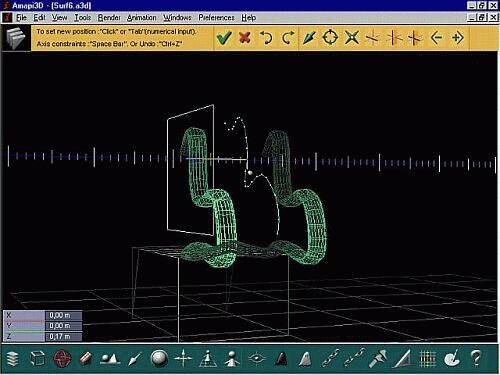
| Here's back to Perspective projection and with a view at a different angle. The newly created polyline is between the two parts of the frame, but we can move it elsewhere (click/drag-and-drop it, use SPACEBAR to toggle the axis while moving it). | 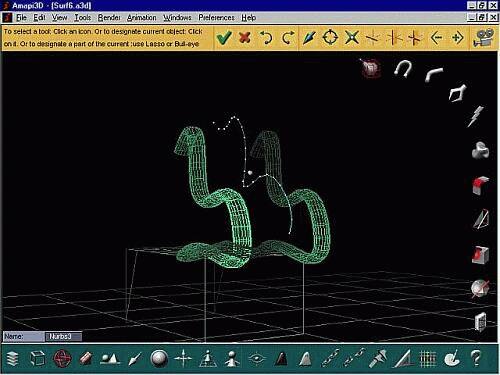 |
| We can now easily duplicate this curve a few times. The
assembly toolkit
has a duplication tool. You click that tool, then point and click at
the
curve you want to duplicate, and click again to indicate where to place
the copy. Use the SPACEBAR to toggle and confine the motion to pure
horizontal.
Repeat this for a few duplicate curves. |
 |
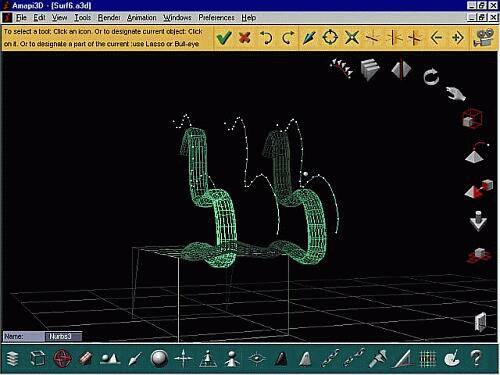
| Here's 3 curves. They are ready for use in the creation of a
mesh going
through the curves. Since the curves are Nurbs curves in this case, the
surface will be a Nurbs surface.
Note that we don't have to explicitly do it this way, we could have taken just one curve (profile curve we drew earlier) and swept it manually in a few steps from left to right. Or you could create one curve like before and another one that's a guiding path for extrusion. Or you could create a hull with multiple profiles,
contours,.... a Gordon
surface, or other types of surfaces.
|
 |
| In this instance however we'll use the Ruled surface tool. Just click the tool, then click the various curves (even if they are not coplanar or have different numbers of points). Amapi generates a Nurbs surface going through these Nurbs curves. | 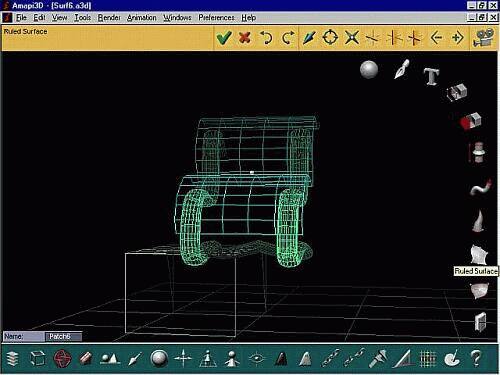 |
| It is now possible to learn a few things about the newly create part. Click the '?' (question mark) icon in the lower right of the control panel if that is the currently selected object, or simply double-click the part to get its information. (in other cases, such as lights or cameras, other types of details will show). | 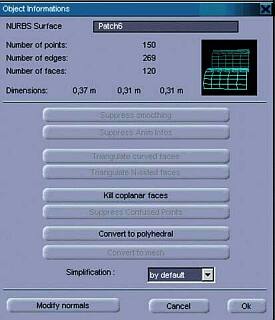 |
| If you ever want to simplify the complexity, especially in non-Nurbs cases, e.g. after importing an external file, you may want to click some of the options exposed in that property sheet. In this example,we've killed the coplanar facets. | 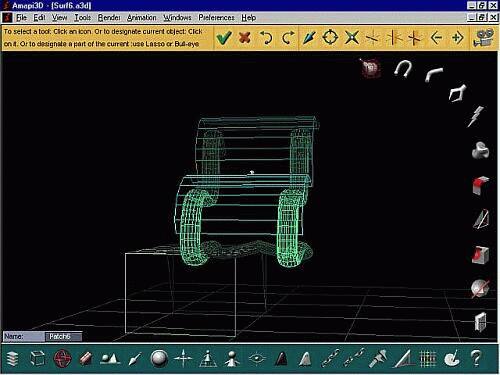 |
| Instead of removeing detail, you may want to add detail,
perhaps with
the fileting tool (it's not a bevel for us here, it's just more
vertices
and edges where we want them).
Another thing to do is use the Stretch tool and fiddle with the location of the vertices. Note that in this case the topology is left intact, we just change the geometry, i.e. where the XYZ locations are for these vertices which we move. This would mean that if we used Amapi through a plugin connection (such as the 3DSMax plugin under NT), the Nurbs surface could go right back into the Max scene and if we had already applied some textures via u,v mapping, then the u,v addresses would still be at the right locations on the vertices, wherever they'd moved. Here' I'm starting to stretch the top and adjust the sides of the futon's frame work.
|
 |
| The end result is that I can easily start creating places where the surface is folded, wrinkled and otherwise gives a pleasant natural (organic) appearance. | 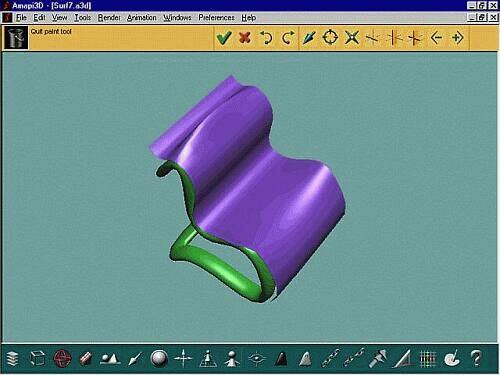 |
| At this point we'll use the thickness tool to make the
surface thicker.
Hit the SPACEBAR if the thickness preview is showing on the wrong side
(bottom), this will toggle to the other side.
Use the +/- keys while in the thickness tool to change the thickness. Later we can add more filets, more tesselated details on individual facets, and use the Stretch tool again to create more wrinkles. This is all done intuitively and quickly with just an approximation in low polygon mode.
|
 |
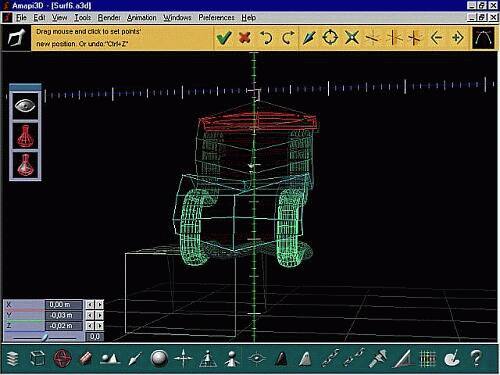
| Finally, we're ready to give it a more organic look by smoothing. Apply any of the 5 smoothing methods. Some may require a change in totpology (such as getting rid of curved faces), so remember to check the surface data sheet (properties) by double-clicking on it if there's a problem. In this illustration here, we're using the Bezier smoothing method. That is the original one which AMapi has had in earlier versions (Doo, Catmull and other 4 were added since release 5). | |
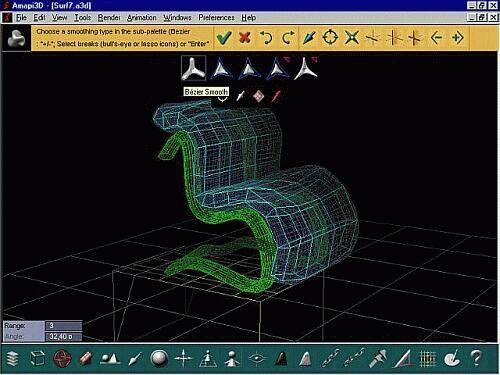
| You'll notice that Amapi shows the smoothed surface in purple
(fine
mesh) if you use the +/- keys to change the level of tesselation. Also,
if you hit Enter at this point, you'll exit the smoothing tool and
validate
that selected level of smoothing. You'll then have many more polygons
to
deal with. It is recommended to click the futon for a preview (in case
you didn't use +/-) and then swipe the mouse back out to return to the
original (at least for Bezier smoothing method). Amapi then remembers
(caches)
the smooth version and just remembers that it needs to apply that
smoothing
again next time you render.
|
 |
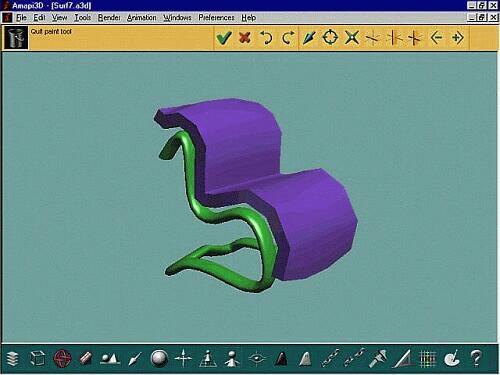
| If you now use the stretch tool, you can further
work on
various detail areas, create folded wrinkles, etc... and keep doing
this
by working with the original low res frame (cage) which you see here in
light blue (!). Amapi dynamically recalculates and shows you the
resulting
smooth surface while you move a vertex (or many) of the rough control
cage.
Note that this is no longer a Nurbs surface. Even thoguh we started with one, I intentionally used the thickness tool, creating a volume (closed polygonal surface). But it is of course possible to create a similar closed area with a set or Nurbs patches if you model it differently, such as via a sweep and capping. |
|
| The interesting thin in the end will be to show this model
over the
web. Saving it as a ZAP file makes it very compact. Amapi 5.01
saves
it as a 100 kb file (because of a glitch in which the ZAP export saved
the resulting mesh instead of the original rough low polygon cage).
This
was fixed in v5.1 (and also worked in 4.15). The resulting file is back
to just 6 kbytes! Perfect for viewing over the web or sharing with your
customers. Doing some further compression (e.g. ZIP format) shows about
3 kb overall. ZIP-ZAP!
|
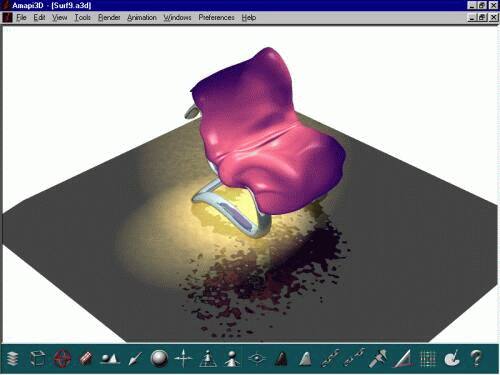 |
| Another thing you can naturally do with Amapi is render a fairly realistic (raytraced rendition of it. Here's a quick example with bump and reflection mapping on the floor, 2 spot lights casting shadows with smooth edges, reflection on the metallic frame of the designer chair. Look at those wrinkles on my leathery futon chair. | |
ZAP and other file sizes
When you create your cool 3D model, you'll want to be showing it off
to your buddies, clients, mother-in-law,... or not.
Whether you're in the business of selling 3D models, or you have
digitized
the latest archeological finding and created a 3D surface model of it,
polygonal or Nurbs, there is a good chance you'll want to show the 3D
model
to someone, and in various ways.
Let's take a look at just the first part of our seat model from the earlier example above. The frame was created as a Nurbs surface.
The raytraced rendering above is just one example of a typical illustration you'll need to do, so consider using Amapi's raytracing for anything that needs static images like JPEG or Targa, TIFF, BMP (e.g. for a presentation with an office application, slideshow mode....)
Here are some other commonly used formats, and their file sizes. If
your browser is not configured with a builtin plugin or helper
application
for these formats, you may want to right-click (or click and hold) on
Mac)
and select "Save Link As..." to save the file to your local hard
drive for later viewing.
| 2D and Animated Formats | |||||||
 |
Animated GIF - 153 kb - produced with TGS 3Space ClipArtist and timed with GifAnimator from TGS 3Space Publisher 2.0. [click the image to view the animation] |
||||||
|
|
|||||||
 |
AVI video clip - 208 kb - using default Windows codec, produced by TGS 3Space Publisher. When extracting all frames into individual BMP files, a total of 2.22 Mb is needed! [click the icon to view or load the animation] |
||||||
|
|
|||||||
 |
When you don't
need the
absolute highest fidelity and quality in pixel-per-pixel replication,
but
have to create a more compact format to view the animated clips,
consider
using the RealMedia format, and publish with various user's bandwidths
in mind. These 3 clips were simply produced with the free RealProducer7
tool from www.realmedia.com:
|
||||||
| 3D Formats: VRML, 3DS, ... ZAP! | |||||||
|
(804 kb) VRML 2.0 (408 kb) |
These are
examples of using
the VRML formats, v1.0 and v2.0 respectively. Note that these are ASCII
files, and they can of course be compressed, to zip, or gzip, or
similar.
Using a popular compression utility at the highest compression, I've
found
I could get these files down to 134 kb and 258 kb
respectively. These files don't have too much wasted whitespace like
leading
spaces or tabs on each line, so they're about as good as it gets with
ascii
VRML files.
A little bit of additional compression might be obtained with a binary form of the file (VRML 2.0). Still, given the nature of the data (over 6000 polygons, or over 10,000 triangles if converting quads to triangles in Amapi), it is doubtful that a VRML representation could keep this under 100 kb after compression. For this you need Nurbs representation like in ZAP or Amapi. |
||||||
|
|
|||||||
 (169 kb) |
So what's the 3D options? What if I save the model (8x8 Nurbs
smoothing
- 6000+ polys) into a 3DStudio file? That's a binary file, should be
fairly
compressed, and download fast. You could then view it with various
viewers,
such as the one which is part of the free converter '3DWin'.
The image to the left is linked to a 3DStudio file, exported
from Amapi.
It measures 169 KB. A little bit of additional
compression
could be obtained (I got it down to 112 kb in Arjfolder's Zip
compression),
even though it contains largely binary data. (or so I think at least).
|
||||||
|
|
|||||||
|
[1.3 kb only] |
And now for something completely different.
First the original Amapi 3D file (v5.01) - Nurbs model - 3773 bytes (yes, just 3.4 kbytes! - regardless of smoothing level) Another similar model, still in Nurbs format, exported as ZAP file - Nurbs model - 1.3 kb bytes (yes, just about 1300 bytes regardless of smoothing level) Click here to view the 3D Model in a ZAP player right now. (IE 4.01 and higher needed, PC only at this time, ActiveX player will be offered to download/install). If you want to
reconstruct
the model yourself, using Amapi 3D, here
is a 3kb file with the construction curve.
|
[ top
]